Much has been written about the sag that develops in the rear suspension of the Triumph Spitfire. The telltale signs are excessive rear wheel negative camber and a nose that seems to point upwards. The conventional solution is to replace the tired transverse leaf spring. This is both costly and, by some reports, not always effective in restoring the car to a level attitude.
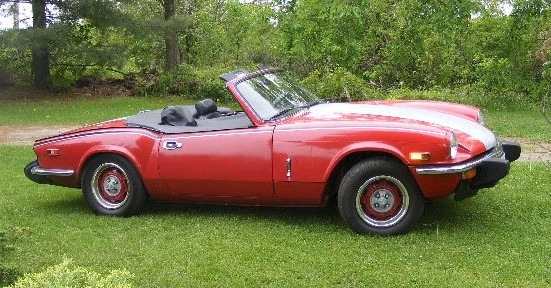
Sagging rear suspension is visible from the side and as negative wheel camber when viewed from the rear
I purchased my 1976 Spitfire 1500 in March of 2009 and have had the rear end issue on my "to-do" list since that time. After much on-line research of the issue, I decided to try the approach which I think was first described by the Triumph Club of Holland, namely to replace the original rubber disc bushings between the spring leaves with new PTFE (Teflon) buttons (sometimes called thrust bushings).
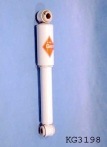
I obtained these from an eBay listing for $35 plus shipping. The set includes 8 buttons as required for a GT6 spring, although only 6 are needed for the Spitfire. The RH shock absorber was leaking (upon removal, it was found to be totally non-functional) so at the same time, I decided to replace the shocks with KYB gas units.
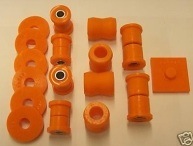
Lastly, the suspension bushings would be replaced with polyurethane versions. The latter were also obtained on ebay for about $60 plus shipping (Flo-Flex brand from the UK). For those who might be interested in an economical source for KYB shocks, I recommend Performance Parts Now in Las Vegas. Even with shipping and the usual UPS brokerage fee, the total for two rear shocks was about $50.
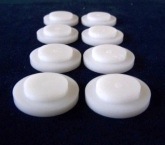
Left: Set of Teflon leaf spring thrust bushings
Center: Set of rear suspension urethane bushings (differential pad is at the right)
Right: KYB KG3198 shock absorber
Spitfire Rear Suspension Disassembly
For this project, I was glad to have the help of fellow Boot ’n Bonnet member Walter Stoller, including a spot in his heated-floor shop.
The first step was to jack up the rear end and support the frame on two jack stands. As I wanted to inspect the u-joint on the LH axle, we removed the entire LH axle assembly which entails disconnecting the brake line, the trailing arm, shock absorber, and leaf spring bushing from the hub and suspension uprights, as well as the four bolts connecting the axle to the differential flange. However, it is not necessary to remove either axle to extract the leaf spring (in which case, it is not necessary to disconnect the brake lines). The Haynes Manual and Leyland Repair Operation Manual have excellent drawings and instructions for these operations.
The instructions and photos that came with the Teflon buttons (also available online) are also helpful. We left the RH axle in place and just disconnected the trailing arm, shock absorber, and leaf spring on that side. The Spitfire Mk IV and 1500 have a floating leaf spring arrangement that reduces the rear wheel camber change when cornering hard, a problem that caused much comment about the original Spitfire swing axle suspension.
Only the main leaf is attached to the top of the differential housing. The attachment studs are accessed by removing the interior panel and carpet piece behind the seats. The access panel can then be removed exposing the four studs that attach the main spring leaf to the differential. There is just enough room to use a socket wrench to remove the studs.
When new, it was necessary to tighten on a second nut on top of the first to permit removal of each stud (really a threaded rod). In most cases, after 30 years, the nuts are corroded in place and you can just remove the nuts and studs in one piece (at least something has gotten easier with age!). The entire leaf spring unit can then be removed from one side with a bit of twisting to clear the differential.
The shackles (spring clips in the British manuals) were removed, in some cases by simply shearing off the corroded bolts. A metal tag labelled "front" is attached under one of the shackle bolts (more about this later). The main leaf is attached to the central pivot bracket (which is the differential attachment point) with a transverse bolt and bushing that passes between the adjacent leaves. Once this is removed, the leaves can be separated. Several of the original rubber discs between the leaves were still in place but they were severely compressed and distorted. There is also a rubber differential pad inside the pivot bracket where it contacts the leaves. I cleaned the rust from the individual leaves with a wire brush and sandpaper and painted them before re-assembly.
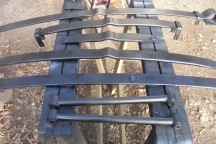
Spring leaves and trailing arms after painting. Old rubber bushings not yet removed.
Using clamps to compress the spring, the four shackles (with shiny new bolts/nuts/spacers) were installed while at the same time keeping the new Teflon bushings in place. Patience is required. With the new urethane differential pad, it was nearly impossible to compress the spring enough to get the transverse bushing between the leaves to line up with the holes through the pivot bracket and insert the transverse bolt. This was due to the extra thickness provided by the Teflon discs and the urethane pad. Use of hammers and centering punches eventually yielded success. This is where two people are needed—one to keep the other from giving up!
I removed the old rubber/metal bushings from the leaf spring and trailing arm eyes using a propane torch to burn the rubber enough to allow them to be pulled out with pliers after punching out the metal inserts. Inserting the new urethane bushings and metal inserts is easy as the urethane parts are in two pieces which are pushed in from each side of the eyes. I decided not to use the urethane bushings in the shocks as the KYB units had new bushings already installed.
Spitfire Rear Suspension Reassembly
As they say in the procedures manuals, re-installation is simply the reverse of disassembly. Unfortunately, it is not always that simple.
Proper front-rear orientation of the spring is achieved by noting the machined central portion on the main leaf, which is oriented toward the rear. I think the "front" tag on the shackle was to allow the spring to be installed on the assembly line without referring to the machined area on the main leaf.
Attachment of the leaf spring to the differential presented no difficulties, but once the LH axle was re-attached to the differential, getting the leaf spring bushings, trailing arm bushings, and shock absorber bushings to line up with the hubs and suspension uprights was a real test of perseverance requiring the use centering punches, hammers, and even 2x4 prise bars.
New hardware was used in all cases and with freshly painted suspension parts and new shocks, the end result was definitely visually satisfying. The real test of success of course came when we had the car once again sitting on the floor on its own wheels. I backed it outside the shop in order to let the suspension come to its normal set and sure enough, the rear wheel camber was now visually neutral and the whole car took on a level appearance.
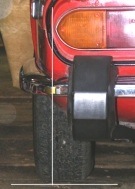
Diagram illustrating rear wheel camber
It should be noted that the factory spec allows for over 2 degrees of negative camber. A test drive confirmed the improvement with the view over the hood taking on a new perspective and the road-handling over bumpy country roads more like I remember my old 1969 Spitfire Mk III when it was new. Credit the new shocks for that.
I am not sure what the urethane bushings have contributed but at least they should last a long time. The rear end levelling and elimination of the negative wheel camber must be credited to the Teflon thrust bushings and urethane differential pad. The extra thickness of the rear spring assembly is probably near an inch which translates directly to extra height.
Considering the relatively modest investment, I would strongly recommend trying this solution to rear end sag before considering a new spring and/or adjustable gas shocks. Remember, the Spitfire is really just a Meccano set for grownups.


and will be painting tomorrow. I ordered the Teflon bushings from eBay yesterday-
hopefully they will arrive soon. I am looking at the leaf spring, and I only see
indentations for 6 bushings. Is it definitely 8 on a Spitfire? I only see indentations or
marks from previous bushings under the top three "leaves." thank you very much for a
very informative article and for your help- wish me luck!
Lloyd
Thanks for the info- I've read elsewhere that on the mkIII and previous 8 bushings are
used, and on later models only 6- not sure if that is accurate or not but perhaps a little
justification for using only 6. As a matter of fact, I ordered the poly bushings from Flo-
Flex, just as you suggested above (purchased the forward bushing kit as well for a
later date). I'm just waiting on delivery. Once again, thanks for a very well written
article- I'll let you know how this turns out.
Matt
accomplishment.
Want to leave a comment or ask the owner a question?
Sign in or register a new account — it's free