
I recently got around to getting the "Magic Buttons", which really are just teflon washers shaped to look like a small top-hat. When they finally arrived in the mail, they came with a great set of instructions - that required you to remove the leaf spring from your car.
Having done suspension work in the past, and looking over the instructions, I decided the best way to get my leaf spring in good shape was to pull it out, examine it, insert the buttons and carry on. Upon removal, I decided to pull the spring apart and rebuild it. Steps and results as follows:
Vehicle Completed On: 1979 Triumph Spitfire 1500
Difficulty Level: Intermediate
Tools Required:
- Wheel Chocks (2), Jack
- Jack stands
- Tire Iron
- Set of Imperial box-end wrenches - Common sizes used were 9/16, 11/16, 3/4, 1/2, 7/16, 5/16.
- Ratchet in above mentioned sizes.
- Two large flat bladed screwdrivers, one small flat bladed screwdriver, one phillips screwdriver.
- Rags(optional), Paint Scraper (optional), CLAMPS, Sandpaper.
Supplies:
- (4) 3inch 7/16 head 1/4 dia NF thread studs
- Self-etching Primer
- Penetrating Oil
- Paint of your choice
- Degreaser
- Teflon Spring Buttons
- Replacement bushings as needed
- Replacement hardware as needed
Step 1
Chock your front wheels and loosen wheel nuts, leaving emergency brake OFF (this is why it's important to chock your wheels).
Raise the car and place the frame on jack stands on both passenger and driver sides.
Once your wheels are clear of the ground, remove your tires and set them aside.
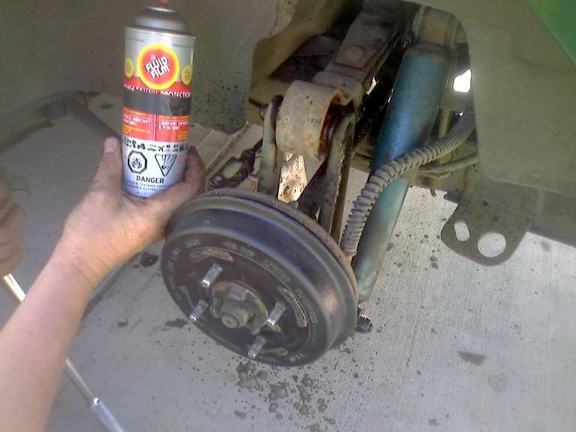
Spray any bolts and nuts you will have to remove to allow your leaf spring to come out with penetrating oil, being careful not to use a product that will cause your rubber bushings to swell.
On the leaf spring there are shackles holding it together which will need to be sprayed with penetrating oil as well, if you can get it.
Step 2
Remove the rear cockpit board. It's held in place by small philips head screws and is really easy. Pull the top up if you are having clearance issues. This will expose the back of the gas tank and the cap covering the differential.
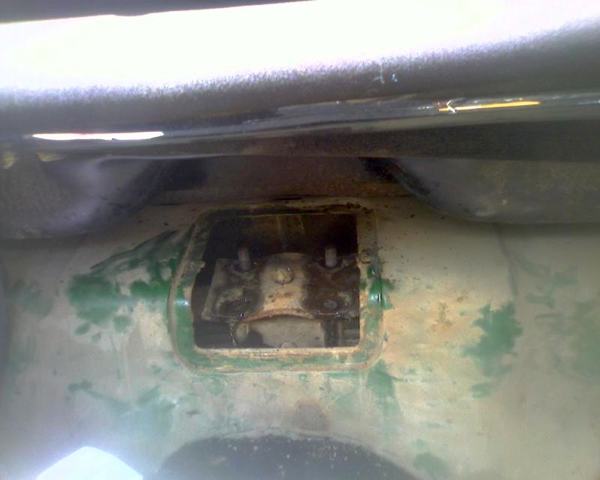
Remove the cap covering the differential using a 5/16 shallow-socket ratchet or box-end wrench. Set the cap aside for paint prep later. This will expose the area where the leaf spring attaches to the differential.
On Spitfire (or swing spring) cars, there should be 4 Nyloc nuts on studs, on GT6 (fixed spring and rotoflex) cars, there are 6 studs. (credit for the extra info on stud specifics to Andrew Mace, as below.)
Step 3
Once the penetrating oil has set in and the nuts and bolts attaching the spring to the vertical links are free, remove them. I used a 11/16 wrench on one side and a 11/16 socket on the other on a breaker bar.
Be careful of the amount of shear forces applied, these rusted studs are now weaker and will twist and shear apart. If it does not want to break free right away, spray more penetrating oil and wait. It's better to be patient and do it right than it is to break your bolt and have to go searching in the city for a replacement.
This is a good time to release the shock absorber from up top as well, or heck, pull it out entirely and not have to worry about it flopping around - to do this I used two 3/4 box end wrenches. This will allow more play in the hub and give you more room to maneuver your spring once it's ready to come out. No need to tear everything off, but the more out of your way, the better.
Be careful of the hub when you let it swing down, if you apply too much force you risk breaking your brake line, which at that travel point the flexible brake line will be under a little tension.
Step 4
Back inside the car, you can now remove the Nyloc nuts off of the cover holding the spring to the differential.
Here is the tricky part - the studs have to come out as well. If you want to just get the spring out without tearing it apart, you will have to find a way of removing the studs without smashing the threads.
If you are going to rebuild the spring, there is a center bolt going from front to back through the cover that can be removed. Be aware that if you remove this cover it will be difficult to put back together, however, not impossible.
Remove the transverse bolt using two box end wrenches, one front and one on the back. This will allow you to free the cover, exposing more stud threads.
To remove the studs, I tightened two nuts together on the thread until tight against each other and loosened by the bottom nut. As the bottom nut tries to come up, it will encounter friction against the top nut and break the stud free until you can turn it by hand.
Step 5
If you can, grab an assistant to help you guide the spring through and out.
Make sure you have enough clearance on the side of the car that the spring is coming out of. LIFT the spring off the differential (there is a small nubbin protruding from the bottom of the spring that holds it in place) and slide out.
You will have to turn and pivot the spring at some point along the way. It is much easier if you gave yourself the clearance by releasing the shock from the car, as you can now follow the curvature of the spring for better clearance.
In fact, my tired old spring came straight out because it just wasn't as curvy as it should be.
Step 6
Preparation is the key to winning any battle. If you're just going to put the buttons in, you can do so at this point.
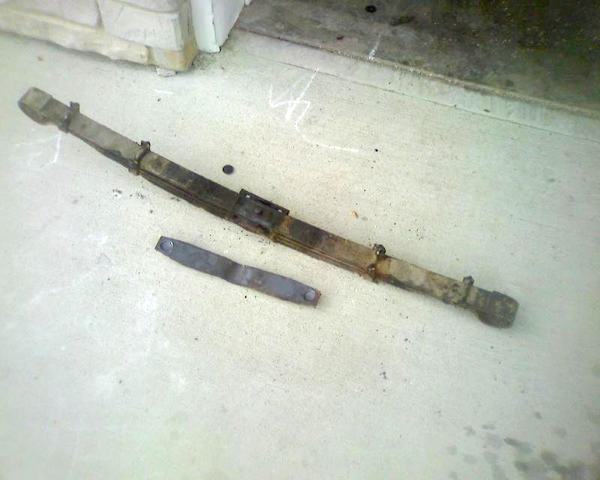
If you're rebuilding the spring, you need to take the shackes (4 of them) apart, releasing all the leaves from each other.
The shackle bolts are 7/16 on 1/4X3 NF threaded half way. They are easy to snap, as these bolts are the most likely to rust solid. Prepare to have replacements handy!
If you are lucky and got them out without breaking or bending them, this would be a good time to wire brush or put them through a die. Remember, National Fine - National Coarse (NC) will mess up your threads badly.
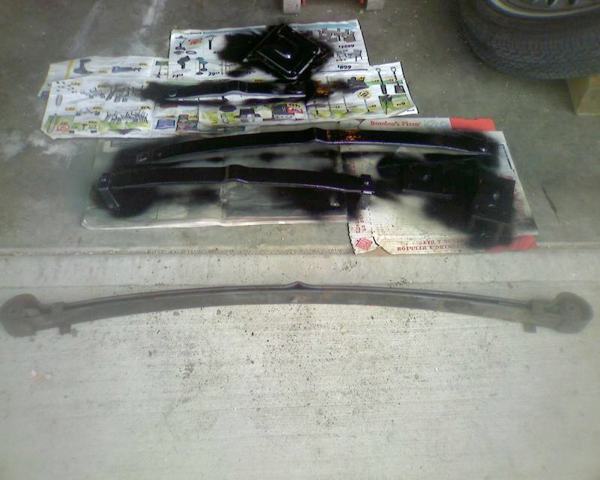
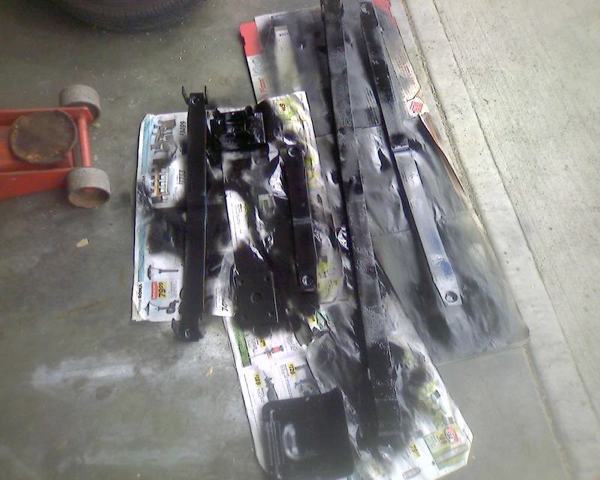
Clean all areas thoroughly with degreaser, rags, water and the paint scraper. Once the surface is clean of all debris and grease, make sure it is well dry. A hit with sandpaper at this point would be a good idea. Inspect your bushings and get replacements as needed.
Prep the leaves, shackles, and hardware with self-etching primer and let dry.
Paint leaves, shackles and hardware with the paint of your choice and let cure completely.
Step 7
Now it's time for the buttons and pads!
Each divot on the spring is a place for the top of the button. I used a dab of RTV sealant to hold them in place as I stacked them back together.
The outside shackle holds the bottom two large leaves together and the inner shackle holds the middle two together.
The top leaf is held by the cover.
Since the buttons are new and thus add much more tension between the springs, when you put the cover on, there will be much difficulty getting the bottom transverse bolt to go in. Use clamps to compress the spring if you can and pry between the cover and the spring below it up, allowing more movement of the guide shaft for the bolt. Slide the bolt in and tighten down on the other side.
The pads can slide in by prying the bottom leaves apart with a screwdriver and popping the pads in. Once you release the upward tension, the tension of the spring should hold them in place. If you are concerned, use a bit of RTV sealant. My pads were squashed but in relatively good condition so I just put them back in.
Step 8
Slide the spring back into the car, using the nubbin on the bottom of the spring to get it into place. Slide the bottom plate around as needed to allow the studs to pass through and thread into the differential.
The long threaded end is the one that goes into the differential. At this point I used my trick of two nuts to tighten the stud down as far as I could, making sure it was below where the cap would sit. Locktite would be a good idea at this point so that the studs do not shake free, however, unnecessary as the studs would just hit the cover and make alot of noise before allowing the spring to come loose.
Tighten the cap down as far as you can go to get the best fit. Replace the cover. Replace the rear cockpit board.
Re-attach the shock absorber and spring to the hub assembly and frame. Put your tires back on and lower the car off of the axle stands. Your car will have a camber now, but should roll out after pulling in and out of the driveway.
Now, enjoy the new feel of your ride!

")


possible add-on to this? Tips for those that do not want to completely
rebuild.
and it makes it much easier to clean and refurbish.
Want to leave a comment or ask the owner a question?
Sign in or register a new account — it's free