
Spitfire & GT6 Forum
Brake master cylinder rebiuld
Posted by 79Spit


|
Topic Creator (OP)
Oct 11, 2013 07:29 PM
Joined 14 years ago
26 Posts
|
|
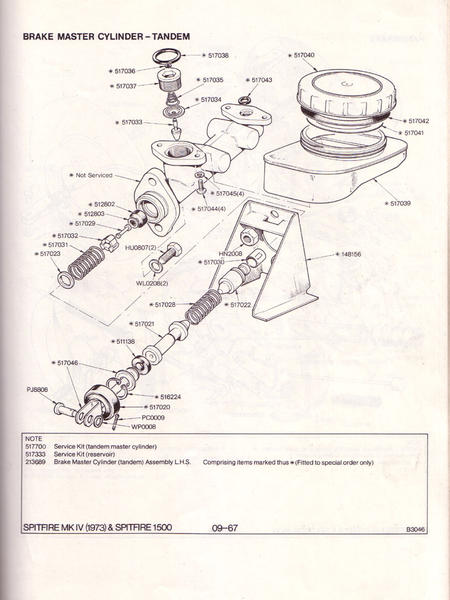
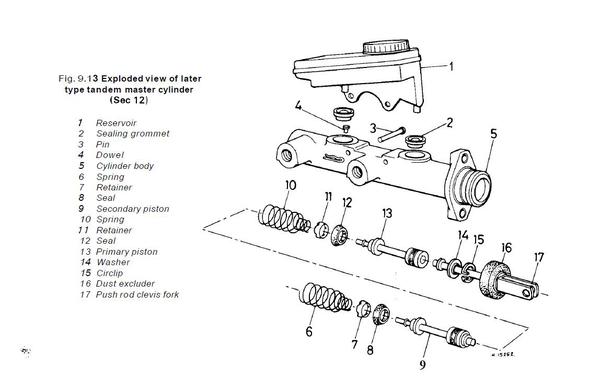
I have a 79 Spitfire and the brake pedal has started to slowly go to the floor when the brakes are applied. Thought it was air in the system so I have bleed them several times. The pedal first works as required and the car stops great. But if you leave pressure on the pedal it goes down. The cylinder is a duel piston type. I got the rebuild kit, but when I took it apart I can not get the second piston out in order to change the seals. What is the trick to get it out. Would hate to have to get a new cylinder if I can just fix this one.
So any ideas?
Pete
So any ideas?
Pete
 Walla Walla, WA, USA
Sign in to contact
1969 Triumph Spitfire "Walla Walla"
1969 Triumph Spitfire "Portland" 1972 Triumph Spitfire MkIV "Spokane" 1975 Triumph Spitfire 1500 "Dayton" & more |
Oct 11, 2013 08:22 PM
Top Contributor
Joined 14 years ago
16,012 Posts
|
I often hear that is a trick. I think a lot of guys will use air input from the outlet pipe. There used to be a special tool to grab it with but I have not seen one of those for years. Hopefully someone will have a good answer for you soon.
Dan
Dan Aycock
Walla Walla, Wa.
Yellowhawk Valley Spitfires
69, 69, 72, 75, 78, 79 Spitfires
TRF# 006047
Dan
Dan Aycock
Walla Walla, Wa.
Yellowhawk Valley Spitfires
69, 69, 72, 75, 78, 79 Spitfires
TRF# 006047
|
Oct 11, 2013 09:13 PM
Joined 14 years ago
95 Posts
|
|
Had the same difficulty !! Take out the rear rubber. Push a bit on the rear piston. This relives the pressure on the little pin in the area below the rear rubber.
If the rear piston is still stuck, I used a 1 1/4 pipe cap over the end of the casting and rapped it smartly on a vice to bring it forward enough to use pliers.
Alan
If the rear piston is still stuck, I used a 1 1/4 pipe cap over the end of the casting and rapped it smartly on a vice to bring it forward enough to use pliers.
Alan
|
Oct 11, 2013 09:49 PM
Joined 13 years ago
162 Posts
|
|


76spitspin
John Erickson
Tolland, CT, USA
Sign in to contact
|
Oct 11, 2013 10:56 PM
Joined 13 years ago
391 Posts
|
 |
Oct 12, 2013 08:28 AM
Top Contributor
Joined 13 years ago
2,715 Posts
|
Al's comment about which MC you have is most important.
I'm with the guys, just "showing" a little air to the outlet hole has always worked for me. Catching it with a rag is also a very good suggestion.
When I did the rebuild (PO had installed an earlier MC) the kit from Obsolete Automotive didn't come with the sealing grommets between the reservoir and body so I just re-used the old ones. Shortly thereafter it leaked and I had the pleasure of refinishing the tool shelf on which it sits.
I was so frustrated I just replaced it with a new one from VB for like $100. Period correct and didn't leak, it's still working great but I know others have had different luck with replacement units.
Not to resurface a whole other discussion that has been reviewed many times, but... also an excellent opportunity to get rid of that DOT 3 or 4. (personal preference of course, but my Spit will never again see corrosive brake fluid)
Good luck.
S
Edit: when my new MC arrived from VB it was this one (URO GMC226). Save the middle man and some money.
http://www.amazon.com/URO-Parts-GMC226-Master-Cylinder/dp/B0066QUSW2
Steve
https://stevew10.wixsite.com/spit16
Edited 1 time(s). Last edit at 2013-10-12 09:47 AM by Manana.

britsnspits
Michael Stoliker
Bethlehem, PA, USA
Sign in to contact
|
Oct 12, 2013 08:30 AM
Joined 15 years ago
14,923 Posts
|

TriumphIdaho
Ron D
|
Oct 12, 2013 09:12 AM
Joined 14 years ago
322 Posts
|
about 1 week and 1 day later...

swmddo
Steve Mills
|
Oct 20, 2013 04:04 PM
Joined 12 years ago
173 Posts
|
I found that the grommet/seals as shown in the diagram (with the wider part at the top) is probably right. I don't remember which way they were before I pulled the old ones out (shame on me for not being more observant), and although the reservoir did fit into the grommets, it (the reservoir) fit MUCH more snugly with the wider part at the top...it sort of 'snapped' in.
Steve
Steve
Having trouble posting or changing forum settings?
Read the Forum Help (FAQ) or click Contact Support at the bottom of the page.
